

Ideal Tire Pressure
Choosing the ideal tire pressure for your ride can be challenging, and here are a few points to consider when deciding how much air to put in your tire for the day’s adventure.
First, it’s always good to think about the worst possible sections of trail that you may or may not need ultimate traction and control.
The next critical point to consider is how puncture-resistant you want your tires to be. Typically, the lower the pressure, the more likely you are to either burp, flat, or damage the rim with a rim strike. Conversely, running high pressure has typically been safer on the flat tire risk side, but you give up comfort and traction by doing this. So to help find that ultimate balance, we will run through the key elements to consider when choosing your tire pressure.
Proper traction/tracking
Proper pressure can dramatically increase your traction as well as tracking. If riding a gravel bike, for an average rider at a weight of 160-170lbs, running around 35psi with a 42m tire is a good starting point. You should pump your tires to the high side of what you think will be comfortable and give yourself some room to let the air out later if wanted.
Rolling resistance
There is an old-school frame of thought; the higher the pressure, the faster the tire will roll. But as we at gulo like to ride rougher roads, this is where things get interesting. Rather than recreate the wheel on this one, Slowtwitch.com published an article a while back that demonstrated the correlation between how higher tire pressure on rough roads can increase drag(which reduces speed).
Rim Style
- Hookless
- This is the newer trend in tubeless rim style. With the tubeless setup, much lower tire pressure can be ridden. On the mtb bike side, tire pressures in the 20’s are typical, depending on your weight. *It’s important to note that with a hookless rim setup, you should never run a pressure over 70psi. There is a point at which the tire could blow off the rim without the rim hook; this can happen when increasing to higher pressure.
- Hooked
- Hooked rims can still run tubeless and utilize lower tire pressure but can also use tubes to be run at higher pressure. Most road wheels are hooked, and pressure from 80-100psi is recommended based on rider weight, road surface, tube or tubless setup, and weather conditions.
You can read more about hooked and hookless rims here.
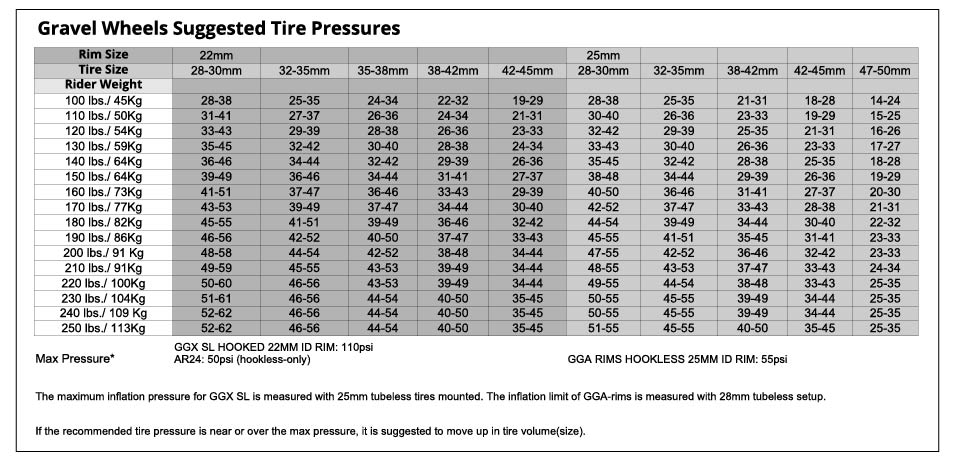
Gravel
For hard-packed gravel and 50% pavement, we like to see a good starting pressure between 30-40psi with a tire size between 32-42mm. This is assuming a tubeless setup with adequate sealant. Rim width and tire size can influence your tire pressure a lot. A rule of thumb, the smaller the tire, the higher the pressure will need to be.
On gravel, we know that there are a lot of hooked and hookless wheels out there. This is sort of the cross-over between road and mountain. While almost all road wheels are hooked, most mtb wheelsets nowadays are hookless. Keep in mind that hookless rims shouldn’t go above 70psi.
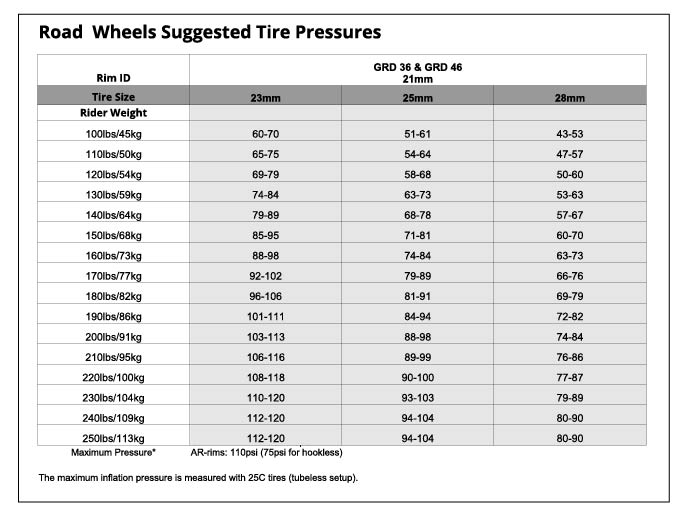
Road
Whether you are riding tubeless or tubes, most road wheel-tire combinations like the range of 70-100psi. If riding in the rain, go ahead and drop to the lowest pressure you feel comfortable with.
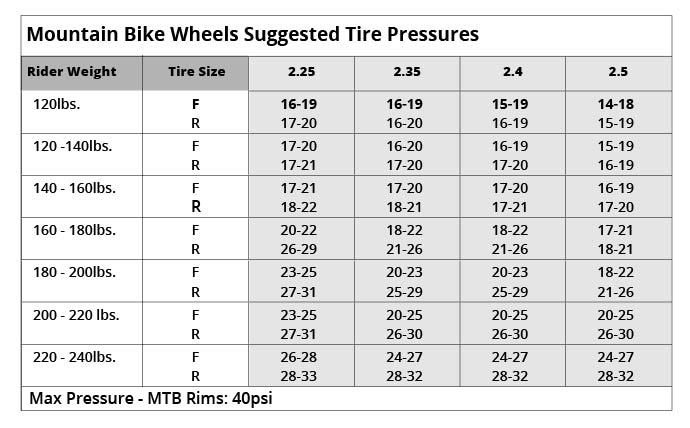
MTB
For Mountain biking, your pressure can have several things which affect it, the most predominant factor being weight, followed by weather, terrain, bike, and tire type.
XC (cross country) – With a higher focus placed on rolling resistance and climbing, you want to run your tires as low as possible to gain the most from traction.
- Rocky trails will dictate a higher pressure to avoid rim damage.
- A wet rooty course will be the opposite as it’s slower, and you want maximum traction.
XC is slower than trail or enduro, with a higher focus on rolling resistance and climbing for this discipline. Pressures run slightly higher, about four-five psi over what you would use with a trail bike, and that higher pressure improves the rolling speed on an XC tire. Another factor to consider with XC tires is the lighter casings which are more susceptible to flats. It’s a balancing act getting the pressure just right for you and your ride.
Trail riding/enduro tire pressures (see tire pressure chart) allow you to ride faster with the suspension absorbing more energy. The thicker casing tire helps protect against flats even though you run with less air.
Then Down Hill riding is similar to your trail and Enduro pressure. However, some riders will go up one or two psi in the front and rear to compensate for the higher speed downhill is generally ridden at.
A general rule is you can use it to start with ¼ of your weight in psi for the front and ⅓ for the rear. From here, you can adjust. If you hear or feel the rim bottoming out, add two psi until you no longer hear the noise.
Racing/training
There will be a difference in tire pressure between racing and training. It isn’t always necessary to have every traction advantage when training, so you may run slightly high pressures.
Tire Width and Size
Your tire size choice will play a significant role in what pressure you should choose. Generally speaking, the larger the tire, the less pressure you can get away with due to the larger air volume.
How to choose
Terrain
- The rougher the terrain, the lower the pressure.
- The smoother the terrain, the higher the pressure.
- Mud: Lowest pressure possible without hitting the rim.
Riding Style
- Your riding style will help guide you for tire pressure.
- You may want lower pressure if you are an aggressive rider.
- Your tire pressure will significantly affect your bike handling, so play around with your pressure and see what fits your style the best.
Weather
Rain/Cold/Hot
When riding in the rain, it’s common practice to lower the pressure by ten percent or more.
The procedure for inflating hot tires is mostly the same as the procedure for inflating cold tires. The only difference is that, when inflating hot tires, you should fill them to approximately 3-5 psi above the recommended level specified by the manufacturer.
Flocycling.com
• The calculations of pressures are based on tubeless installation, given rider weight, average bike weight, specific inner rim width, and standard tire casing. Enduro/DH casing tires can run at slightly lower pressure.
• Never over-inflate. If the tire does not seat at a modest pressure, just deflate it and troubleshoot the problems. DO NOT exceed the MAX pressures we set.
• If the recommended pressure is out of tolerance (minimum or maximum) with your tire manufacturer, you may need to change the tire size to better suit the rim.
•Check your tire pressure before you ride as they lose air over time
• The pressures listed above are recommended starting points. Your pressure may vary depending on terrain and conditions.
• Click here for online calculator